

Deploying from a branch for development#
When developing applications and their Helm charts, it’s useful to temporarily deploy from a branch of Phalanx on designated development environments before merging to Phalanx’s default branch.
Some use cases include:
Testing that a new or updated Helm chart works in a higher-fidelity environment than the Minikube GitHub Actions CI cluster.
Testing how a new or updated application interacts with other deployed applications and cluster infrastructure like databases.
Through this process it is possible to develop an application in a fairly tight loop, though it’s best to augment this practice with unit tests within the application’s codebase.
See also
This page focuses on using a development environment to iteratively develop and test changes to an application, ultimately yielding a application upgrade in Phalanx. You can achieve the same result without the iterative deployment testing by following the steps in Upgrading an application.
If you are deploying an application in an environment where it is not currently running, either because the application is brand new or because you’re adding it to an additional environment, see Switch an environment to a branch.
Preparing and pushing a branch#
Start by creating a branch of the phalanx repository and editing your application. Do not use a GitHub fork; the steps below require that your change be on a branch in that repository.
You can make many types of edits to the application.
The most straightforward changes are updates to your application’s Docker images or the Helm sub-charts the application depends on.
See Upgrading an application.
You can also make changes to the Helm values by editing the application’s defaults in its values.yaml file, or the values for the development environment in the corresponding values-environment.yaml file.
Finally, you can also make changes to the Helm templates for Kubernetes resources.
Commit your changes and push your branch to GitHub. Throughout this process, you can continue to commit changes and push updates to your branch to GitHub.
Tip
When testing development versions of a service, it’s useful to force Kubernetes to pull the application’s Docker images every time a Pod starts up.
This way you can push edits to the Docker images with a specific development tag [1] and then have your test deployment use those updated images.
This setting is controlled by the imagePullPolicy key in Deployment resources (and specifically their Pods).
In typical application Helm charts the image pull policy is accessible from Helm values.
In the application’s Helm values file for the development environment, set this pull policy to Always:
image:
  pullPolicy: Always
Consult the Helm values documentation for your application for details.
Switching the Argo CD Application to sync the branch#
By default, Argo CD syncs your application from the default branch (main) of the phalanx repository.
Change the application in Argo CD to instead sync from the branch you’ve pushed to GitHub:
Open your application’s page in your environment’s Argo CD UI. You can find that URL by going to the documentation page for your application under the application list and choosing the Argo CD link for the relevant environment.
Click on the resource of type
Application. In the tree view this is the root node.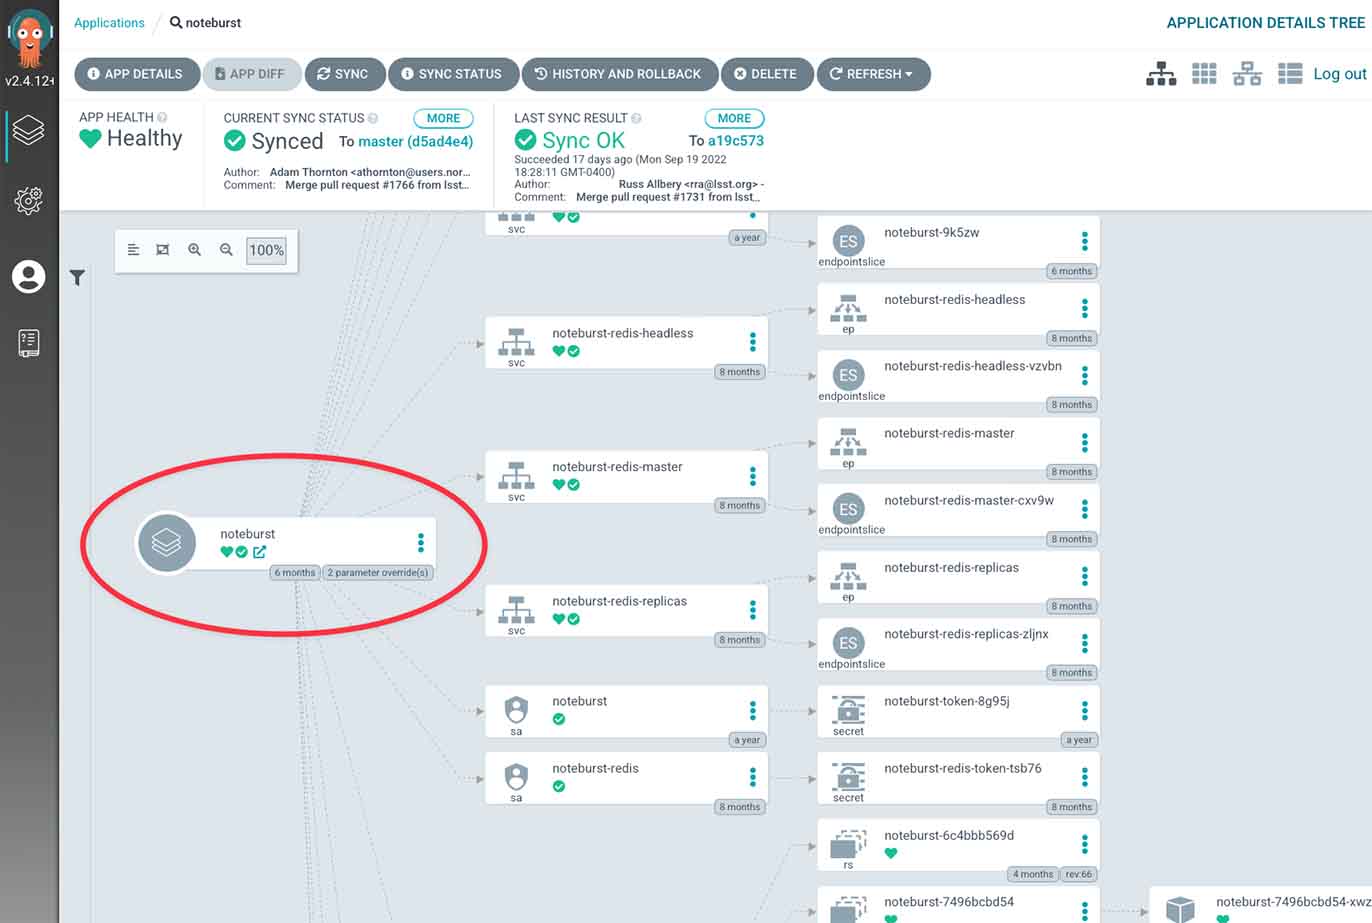
Click on the Edit button in the Summary pane.
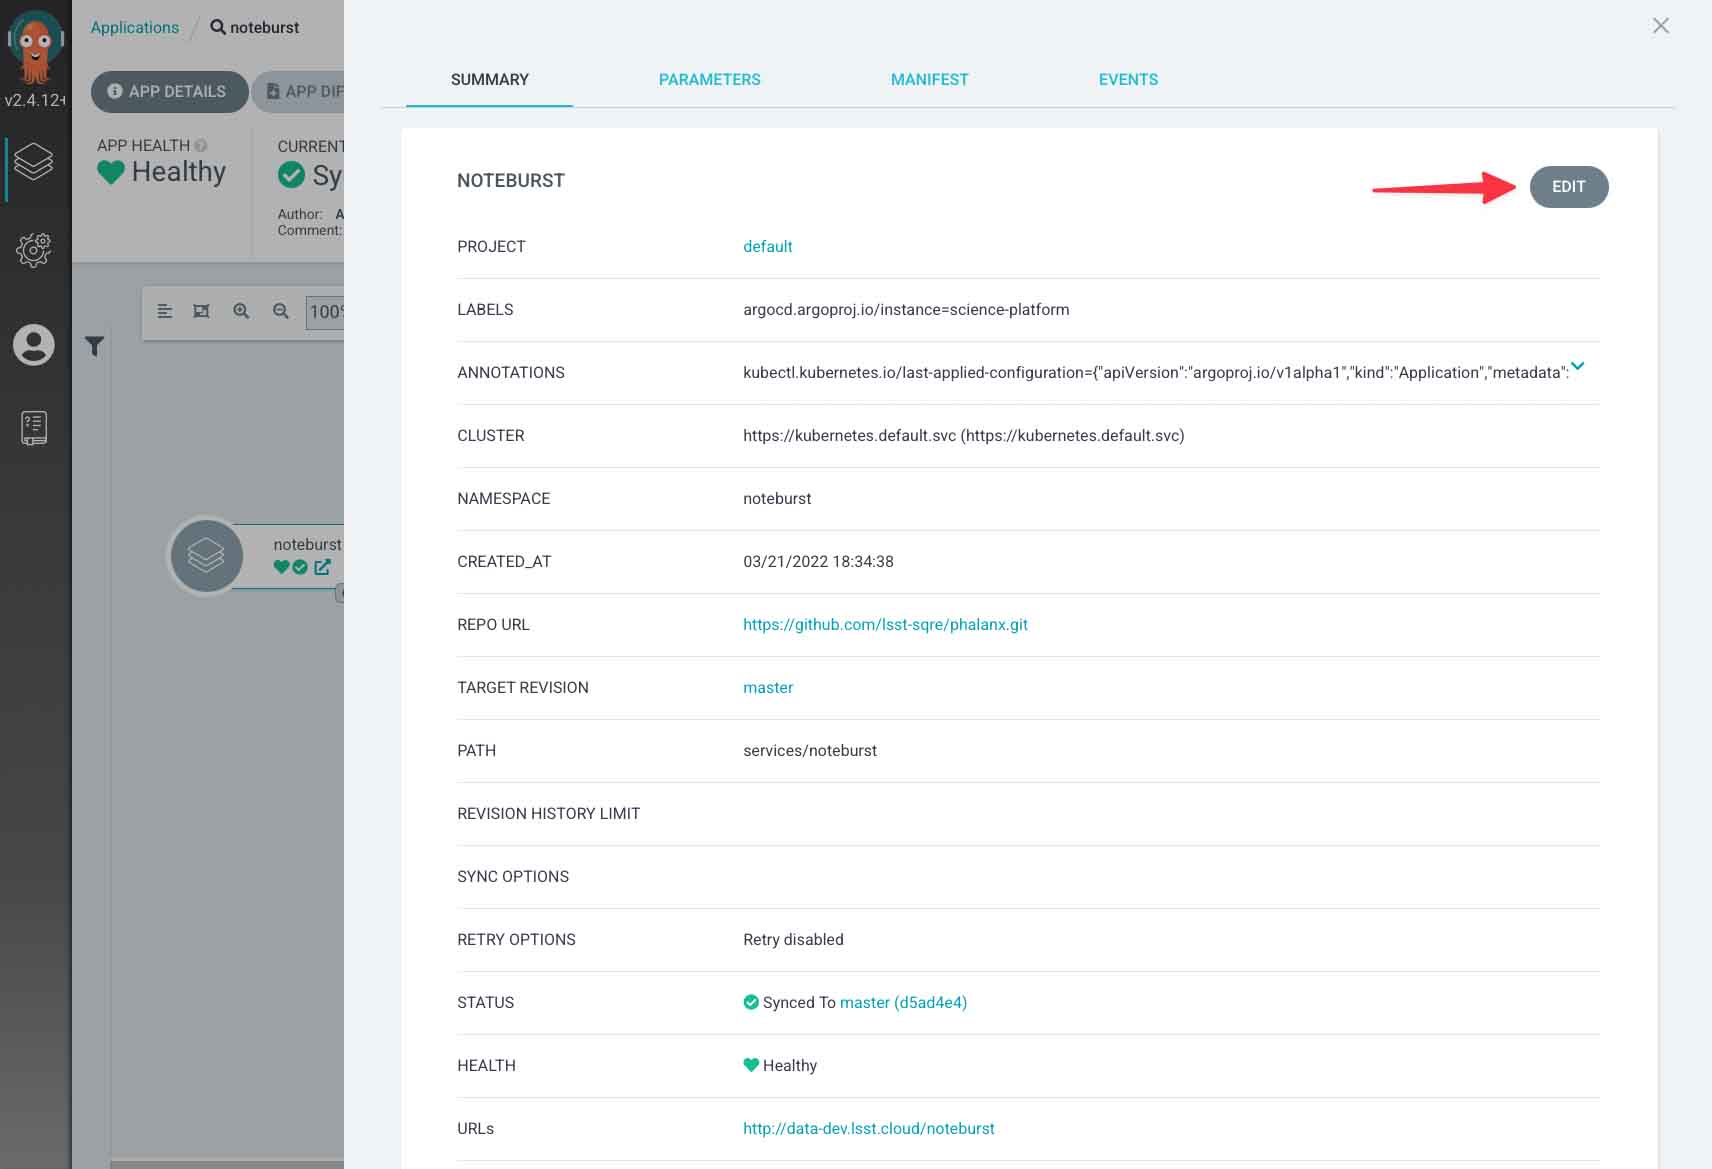
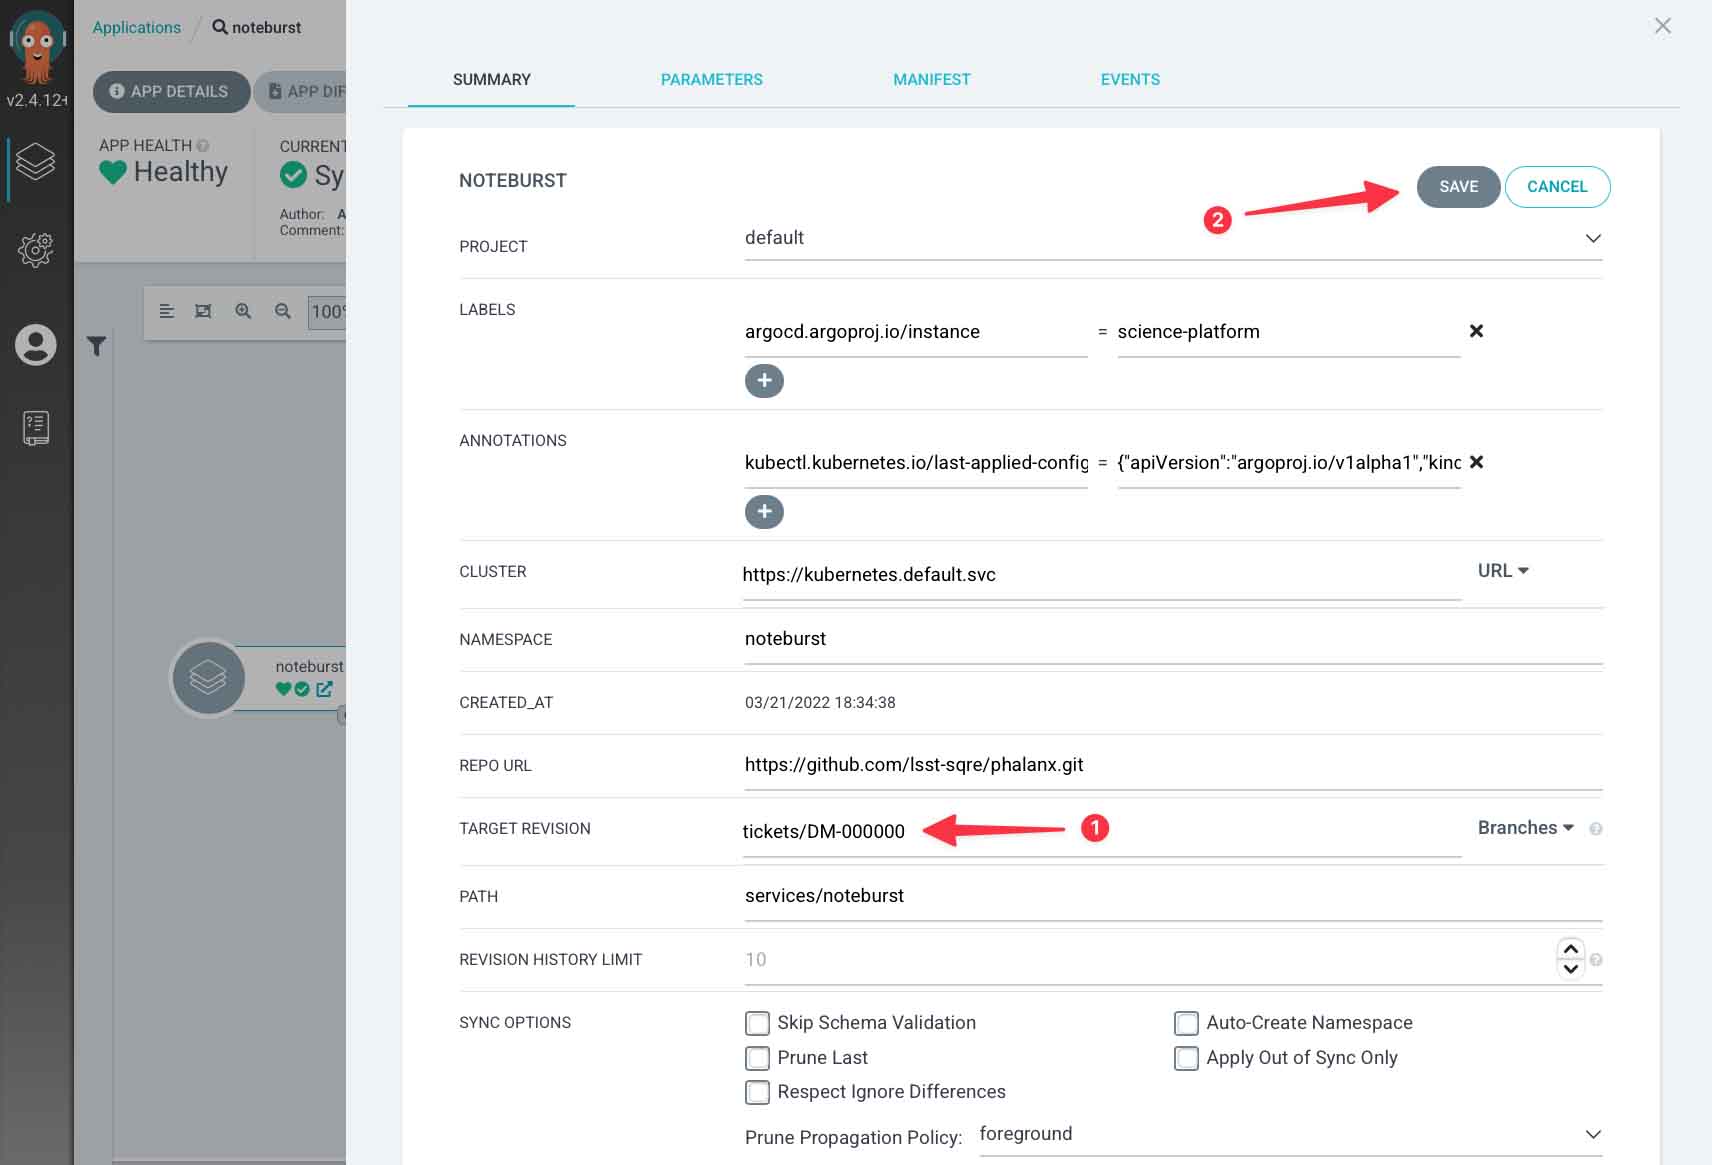
Edit the application to sync from your branch:
Edit the Target revision field and enter your branch’s name.
Finally, click on the Save button.
In the application’s page in Argo CD, click on the Sync button to redeploy the application from your branch.
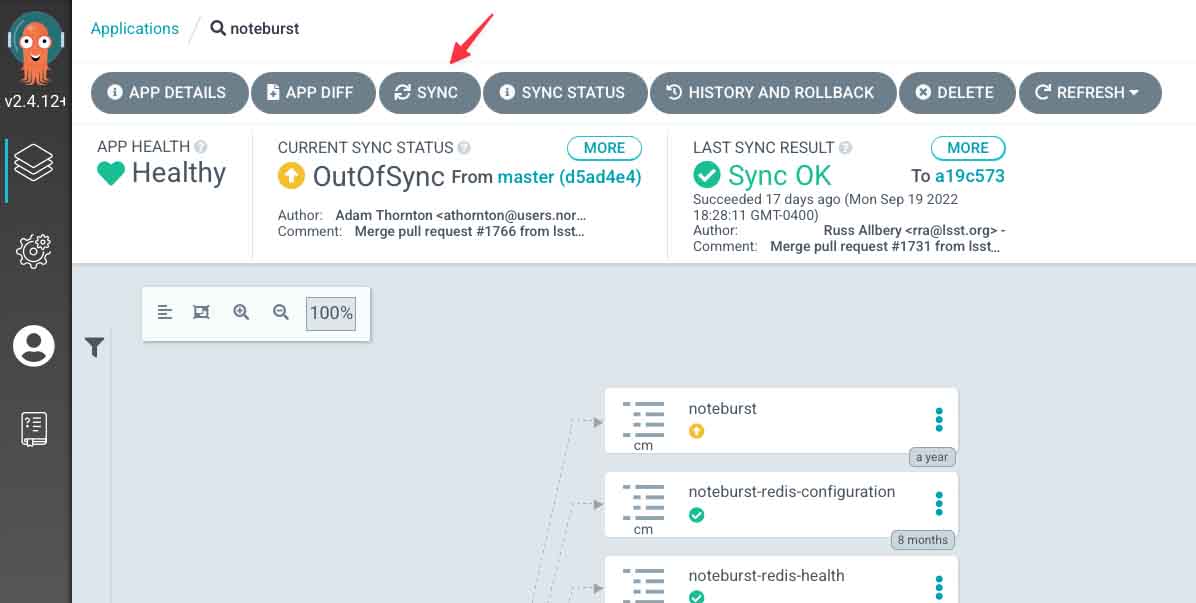
Once you have done this, the science-platform Argo CD application will show as out of sync.
This is correct (you have manually modified it), and serves as a helpful reminder that this application is running from a branch.
Updating the application’s Helm chart#
While your application is in active development, you may need to update its Helm chart and corresponding Kubernetes resources. There are two ways of approaching these updates.
Editing resources directly in Argo CD#
The fastest method for trying out changes to Kubernetes resources is to directly edit those resources in the Argo CD UI. In your application’s Argo CD page you can click on a specific resource (such as a ConfigMap or Deployment) and click the Edit button on the live manifest. Make your changes, then click Save.
Changes made to a ConfigMap are often not automatically applied, since pods usually read their ConfigMap on startup and never again.
If you change a ConfigMap, you may therefore have to restart the relevant deployments to pick up that change.
For instructions on how to do that, see Restarting a Deployment.
After you have made this type of manual edit, the application will show as out of sync, since its configuration in the Kubernetes cluster no longer matches its configuration in Phalanx. If you click the Sync button, it will revert your changes and again make the application match its Phalanx configuration.
Important
Edits to resources via the Argo CD UI are temporary. To make permanent changes, you need to edit the application’s Helm chart in the phalanx repository.
Updating and resyncing from the branch#
When you have edited your application’s Helm chart in your development branch of the phalanx repository, you need to sync those changes to Kubernetes.
Argo CD generally refreshes automatically. If you have pushed your branch to GitHub and Argo CD doesn’t show that your application is out-of-sync, you can click the Refresh button on your application’s Argo CD page.
When your application shows an out-of-sync status, you can click the Sync button on your application’s Argo CD page. When individual applications are synchronized their status changes from yellow to green.
In some cases you many also need to restart Pods in Deployments to see changes take affect. See Restarting a Deployment.
Refreshing a deployment’s Docker images#
Besides developing the Helm chart, you can also test branch builds of your application’s Docker images inside Deployment resources.
To start, ensure that the Deployment is using development builds of your application’s Docker images.
The best way to do this is to edit the application’s Helm chart for the application in the development environment and to sync those changes.
For development changes, you should usually override just the image.tag setting in the values-environment.yaml file for that environment, which makes it clear that this change is temporary.
Save changes to the appVersion in Chart.yaml for new releases.
You should also ensure that the Deployment is always pulling new images, rather than caching them, by setting the imagePullPolicy to Always.
This is covered in Preparing and pushing a branch.
When new Docker images for your application are available with the corresponding branch tag from a container repository, you will need to restart the deployments using those images. See Restarting a Deployment.
Restarting a Deployment#
Some changes won’t affect a running Deployment. For example, many deployments only read ConfigMap or Secret resources when Pods initially start up. To realize an update, you’ll see to restart the Pods in Deployments.
To restart a deployment, find the Deployment resources in your application’s Argo CD page, click on the three-vertical-dots icon, and select Restart from the menu.
New pods will appear while old pods will shut down.
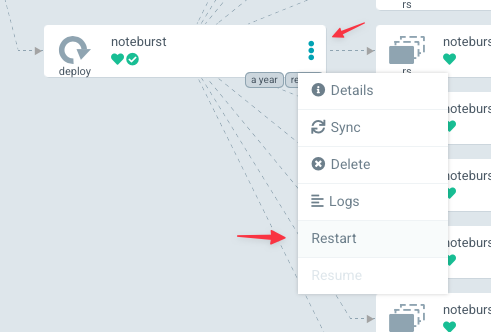
The Deployment drop-down menu.
Click on the three-vertical-dots to open the drop-down menu for a Deployment resource.
Select the Restart item to restart the deployment.#
If the new pods fail to start, they will show a “crash-loop backoff” status and the old pods will continue to operate. You’ll need to resolve the error with changes to the application’s Docker image and/or Helm charts. After making fixes, you may need to restart the Deployment again.
Merging and switching the Argo CD Application to the default branch#
Once development and testing is complete, you should submit the pull request for review following the Data Management workflow guide.
Once your branch is merged, remember to reset your application’s Argo CD Application resource to point back to the default branch (main).
Open your application’s page in your environment’s Argo CD UI. You can find that URL by going to the documentation page for your application under the application list and choosing the Argo CD link for the relevant environment.
Click on the resource of type
Application. In the tree view this is the root node.Click on the Edit button in the Summary pane:
Edit the Target revision field back to the default branch (
main).Finally, click on the Save button.
In the application’s page in Argo CD, click on the Sync button to redeploy the application from the default branch.
Next steps#
While following these instructions, you have iterated on the development of your application and ultimately upgraded that application in a development environment. The next step is to roll out this change to other environments. This activity is normally done by the administrators for each environment. See Syncing Argo CD in an environment for more details.